
Thursday, October 13, 2011
And then she blue smoke...
I saw this today and had ironically did a photo shoot with myself this weekend that is the first beauty trick in the line up. Apparently if you rock these, the guys heads will be a-turning!

Friday, July 29, 2011
inner eye liner
Last summer, I wrote about lining the lower inside rim of your eye. This summer, I'm completely obsessed with lining the upper inside rim of my eyes to define my lashes without it actually appearing that I've taken to lining them.
Lining the upper inner rim with black or brown creates the illusion of fuller lashes. it makes a LINE without there being any visual evidence. When applying, I uses a standard black pencil - I've been loving the stuff by E.L.F. and NYC. Both brands are super cost effective, go on easily and stay! Especially if you are using the waterproof stuff.
Here's one trick, though. If your inner rims are moist, the liner won't stay. Lift your upper lid with one finger - I find it easiest to push up my brow with the non-applying hand. I use my applying hand, a free finger to gently drag across the rim and remove any access moisture. If you prefer, a tissue or cotton swab would also work fine.
Then, just as you would draw a line above your lashes, trace the eye pencil over the upper rim of your eye. Like I noted last year, eventually some of the color may shift. But the beauty of lining the rims of your eyes is that the color shifts outward...straight into your lash line! Creating the perfect, full lash illusion!
Thursday, July 7, 2011
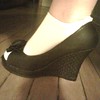
stretching shoes
Happy Summer! It is a happy time in the Upper Midwest when the heat finally approaches the Tundra.
Unfortunately, there is a time or two when I go shoe shopping when it's still a wee bit chilly outside. My feet are all cold and ...well, smaller. Bringing on the heat brings on the foot swelling, too.
So I bought these lovely gems of Fergalicious shoes in late spring. They felt amazing in the store and stayed on my feet as I strutted up and down the aisles. Unfortunately, the first time I wore them out into the real world, I tore a bit of my heel off with every step I took.
NOTE: when breaking in shoes by "wearing" them, do bring many band aids and a pair of comfy flip flops or flats to relieve your feet with.
I haven't worn these since that first foot tearing day two months ago and the blisters/missing pieces of my foot have finally disappeared/reappeared.
The point of this purchase was for a friend's upcoming nuptials on her parents' lawn. Although I'm not a huge fan of wedges, I now own 3 pairs of varying styles. All black to match my dress. But although I have 2 others, this is really the pair that I would like to wear.
So tonight, I started my standard alternative to "wearing them in."
My trick to stretching a pair of shoes out quickly? Throw on a sock, shove your foot in, possibly down a beverage or two (adult if you're of age) and deal with some temporary pain. Tonight, I did dishes, watched some TV and worked a bit with this get-up on my tootsies. My feet are throbbing, but in the morning (after the swelling ceases), the shoes will likely fit and I'll be good to go for next weekend's festivities. I only suffered with socks for about two hours. If they're not ready tomorrow, we'll have another short go with the socks and be on our way.
Sure beats weeks of stretching them by wearing them for real. Many times, by the time my shoes are conformed to my feet, they're about worn out. Boo for that, Yay for speeding the process!
Thursday, March 24, 2011
How to Remove Smudges
I love watching other people apply makeup. Everyone has a little different routine and technique and I always seem to learn something new... whether or not I use what I learned is a different story.
Recently I watched a friend apply loose powder eye shadow as a liner. Working with loose powder is dangerous business. It never fails to sprinkle down my cheek as I'm applying it to my lids. If it's pink or bronze, I may be assisting myself, saving a step of blush applying, but any other color is just messy.
My trick for removal of unwanted makeup mistakes (ie: ever stabbed your nose with your mascara wand, taken your cat-wing eye liner too far, or colored outside your lip line by accident?) is to take my already moist foundation sponge at it. Gently rubbing the foundation sponge on the mistake and pulling the mistake away from your face is my favorite trick yet. With this tactic, you mustn't rub the mistake across your face. The swooping away from your face motion is key and may take a few times to get it right!
What I saw my friend do, I wouldn't have thought of. But it worked, witnessed with my own two eyes. Powder shadow made her under eye resembled a bit of a raccoon. She simply grabbed a cotton swab, moistened it (she used her tongue... I think there's something about a woman's saliva that may be the best cleaning agent out there!) and rolled the cotton swab over the dusty mess. Voila! Raccoon no more. I think eye makeup remover may also work on the cotton swab for this technique.
What works for you? Is there something you do before to prevent smudges? Or a favorite fixing tactic?
Thursday, March 17, 2011
Bold and Beautiful
In case you live under a rock and haven't picked up a fashion magazine anytime recently, let me clue you in on something. This season is all about bright, bold colors. Orange is really hot, especially oranges that lean a little more to the coral side (ie: have some pinkish hues in them). Whether you're sporting bright lemon colored pumps or a pop of pink on your lips, you'll be sporting the trend of the season!
Being that it is St. Paddy's day, I will be sporting bright green eyelids today! Eye shadows are a bit more difficult to make opaque and therefore more difficult to make bold. A key to the eye-pop is to ensure you've got a base down before you apply color. For making a smoky eye, you'd want something more neutral, but not for when you're putting purple, green, blue, yellow, etc on your lids. For sure, as you're evening out the tone of your skin with your foundation, swipe your eyelids too. Seal it with your powder and then apply the shadow. To go one step bolder, pencil your lid in up to your crease with a white eye liner. I like to pat it a bit with the pad of my finger tip to make sure there aren't any definite lines. Then, once the white liner is smooth, go ahead and apply the color.
You can absolutely tell the difference! And the color turns out closer to the color it is in the container.
The eye on the right has a white base. I did all other makeup the same in this picture. Pop!
Tuesday, March 1, 2011
Hard as Nails
My newest love? Revlon Top Speed Nail Polish. La-Love it!
Here's the deal. It's not like other quick drying nail polishes I've used in the past. So far (I've only discovered it a few days ago), each coat stays wet long enough to even it out on your nail. But a mere minute or two later when I inevitably smash my hand into something random, the stuff is hard as a rock!
Awesome find for your funky fashionable three year old or for we clumsy adults alike!
Sunday, February 20, 2011
It's Just Plane Tough
Going on a trip? Does it involve an airplane security line? Don't want to check bags? Need to follow the 3-1-1 rule?
I've become a master of getting what I need into one Quart-sized bag! But, it isn't without sacrifice or creativeness. Having flown through large and small airports, it seems that small airports are a bit more strict on things like lipgloss in your purse. Technically it is a liquid or gel, so be prepared to ditch those if you're headed to a regional airport. Instead, you may want to find a tinted lip balm. I'm fond of the Burt's Bees kind if you're looking for a pop of color.
For makeup, try to keep it as mineral or powder based as possible. This avoids having to use valuable space in your one liquids quart bag on things like liquid liners or cream shadows. In fact, a nice alternative to a cream shadow is a eyeshadow pencil or duo like Cover Girl's SmokyShadowBlast. They essentially give you 2 colors that you can wear independent of each other or use as suggested for a smoldering smoky eye look.
I've always been partial to using black eye shadow with an angled painter's brush for applying black eyeliner. And if you prefer the boldness that liquid liner offers, just add a little water to your brush and turn the powder instantly to liquid without getting caught up in security searches.
Foundation is sometimes the liquid makeup that takes up the most space in my liquids quart bag nestled in my carry-on. Depending on your skin and time of year, you may be able to avoid this product. Or if your moisturizer leaves your skin nice and dewy, you may be able to leave the foundation at home.
The alternative to packing the foundation is a great moisturizer, a cream concealer and a powder foundation. My favorite is a Pocket Powder Foundation from Cover Girl. The beauty of a compact of foundation is that you can throw it in your purse for worry-free touch-ups during your day! And, again, you're not taking up any valuable liquid space in your carry-on!
Your mascara and any powders you have can go right in your regular luggage.
Try to keep your clothing in the same pallet so you can keep your makeup in the same general pallet as well. In general, I like to pack a black, light shimmery neutral like Spun Silk from Mary Kay and a pop of color that goes with whatever you've packed be it blue, purple or green.
In any case, you really want to keep things as simple and light as possible when you travel. Less is more, especially when you have to carry it and deal with today's airport security.
Wednesday, January 5, 2011
It's In-Stain!
Just before the Holidays, I headed to Walgreens to stock up on some must-have's for time at the parents. While there, I scoured the cosmetic's wall to see what there was waiting for me to test drive.
A few months back I ranted about Cover Girl's lip stain. So, although apprehensive, sometimes the brand really does make a difference. I grabbed a bubble gum pink color of Revlon's Just Bitten. This product is the cat's meow!
It appears the difference between the 2 brands is that Cover Girl, although saying it's a stain, really puts a very thin layer of quick-drying product on your lips, where as Revlon really is a stain.
It stayed on just as well as that Kool-Aid mustache you used to sport as a child. Stuck right where I stained it on in the morning until it came off in the eve! The lip balm on the other end of the stick is a nice sealant as well! Help to keep the lips moist and stain to stay.
Subscribe to:
Comments (Atom)